Each hardware device listed in Device Manager must be enabled before Windows can use it on your computer system. Once enabled, Windows can assign system resources to the device. By default, Windows OS enables all the hardware that it identifies. A device that isn’t enabled will be marked by a black arrow in Device Manager or a red X in Windows XP. Disabled devices also show a Code 22 error in Device Manager.
You can enable a device by expanding the category with the device you want to enable in Device Manager. Then, from the device’s Properties in Device Manager, right-click the device and select the Enable device option.
However, the detailed step-by-step guide on how to enable the disabled devices in Device Manager in Windows operating system is given below.
READ | Windows Has Stopped This Device Because It Has Reported Problems (Code 43) [Fix Error]
How Do I Find Disabled Devices in Device Manager?
Command Line To Show Hidden Devices in Device Manager
- Click Start > Run.
- Type cmd.exe in the textbox and click OK.
- Type set devmgr_show_nonpresent_devices=1 and hit ENTER.
- Type cdwindowssystem32 and hit ENTER.
- Type start devmgmt.msc and hit ENTER.
- When the device manager opens, click the View menu.
- Click Show Hidden Devices.
How To Enable Disabled Device in Device Manager in Windows
These steps on how to enable devices in Windows OS to work in Windows 11, Windows 10, Windows 8, Windows 7, Windows Vista, and Windows XP.
Step 1: Open Device Manager.
There are numerous ways to do this, but the easiest way is generally through the Power User Menu in the latest versions of Windows or Control Panel in older versions.
Step 2: Within Device Manager, locate the hardware device you want to enable. Some devices are listed under the main hardware categories.
Navigate through the categories by choosing the > icon or + icon if you’re using Windows Vista or Windows XP.
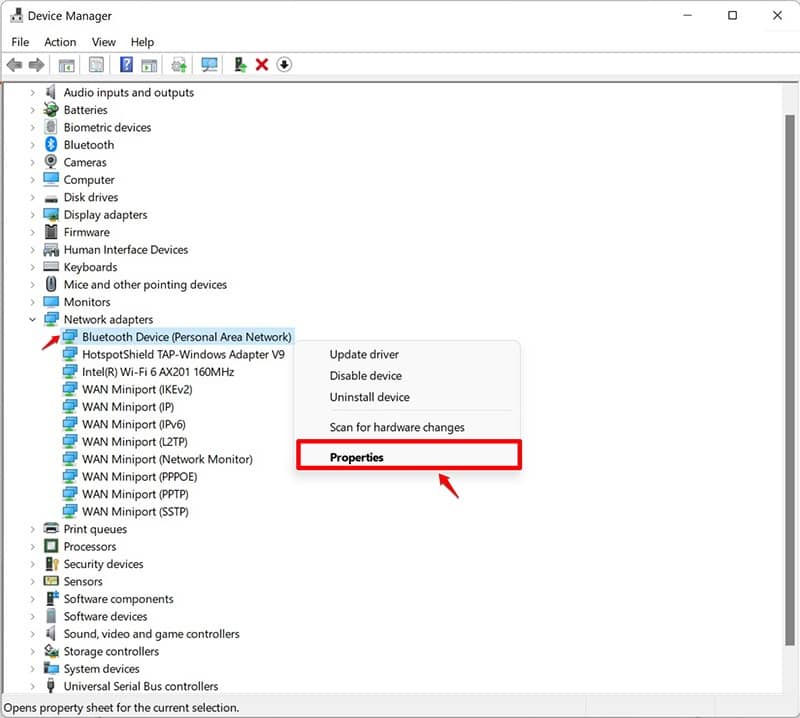
Step 3: Now, after finding the hardware you’re looking for, right-click the device’s name or icon and select Properties.

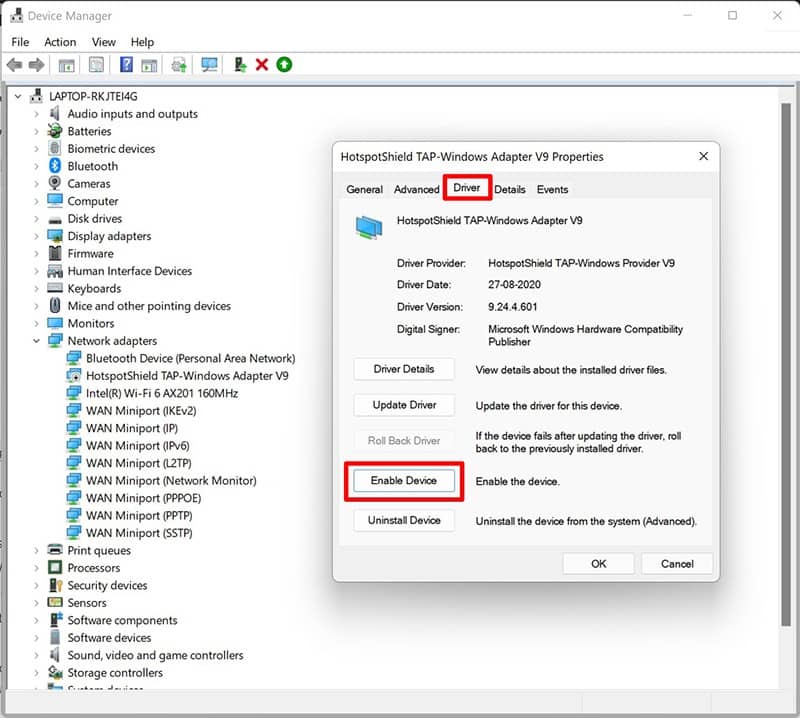
Step 4: Click on the Driver tab.
If you don’t see this tab, select Enable Device from the General tab, follow the on-screen directions, and choose the Close button.

For Windows XP Users: Stay in the General tab and choose the Device Usage: drop-down at the very bottom. Please change it to Use this device (enable) and skip down to Step 6.
Step 5: Select Enable Device or Enable, depending on your version of Windows OS.

You’ll know the device is enabled if the button instantly changes to read Disable Device or Disable.
Step 6: Click on OK. This device should now be enabled, and you should be returned to the main Devive Manager, and the black arrow should be gone.
Conclusion
If a yellow exclamation point appears after the black arrow or red x disappears, you should troubleshoot that problem separately. The yellow exclamation point is a different kind of warning regarding your hardware’s configuration. You can verify that the device should be working correctly by checking the device status in Device Manager.
Hope you find our blog post helpful on how to enable the disabled devices in Device Manager on Windows.

